
Last week I suggested that in context-dependent scenarios a Human One Turn Touchdown (OTTD) could be improved by throwing the Fling before giving him the ball. A line I termed Fling Fling First (FFF). This post digs into how Thrower, Catcher, and Fling positioning can improve Throw Teammate (TTM) likelihood and what that means for both the FFF line and the dual‑option OTTD.
But first, let me quickly explain why this rabbit hole became appealing:
FFF seems, at first, to be counterintuitive; if you throw the Fling without the ball then it will be harder to get the ball to him. This, of course, is true. The reason it is an idea worth exploring is the ordering of the rolls.
- The Fling toss option is lower odds overall than the chain push, so is the backup option.
- TTM involves difficult rolls first, whereas the chain push has difficult roles last.
- The TTM part involves four rolls, 2 of which have Loner, and a third is the un‑rerollable scatter that could leave you out of range, so you have less agency to modify the odds with team RRs.
- Doing TTM before ball handling lets you take the hardest rolls without risking a turnover.
- If the toss fails; commit fully to chain pushes. You can now justify rerolling pows or both down results as you now know it is your only line. Knowledge is power.
- If it succeeds → commit to the Fling, the second half of the sequence is better. In this situation you have traded the now harder ball movement for the knowledge that “its on” and have saved yourself the risk of trying the blocks. The blocks are low risk, but can eat precious RRs.
The context-dependent aspects are:
- You must have enough pieces available to be able to get the chain pushes without needing the Ogre and Fling. Usually this means you need 10 minimum, but ideally 11.
- It is better if you have 2 Catchers available – one to score the push play (POTT) and the other to act as a relay.
- The kick location and kick-off event have to leave both options available. The kick location might force you down one specific line (more on this below).
- FFF value increases when you have at least one RR available. As a key part of the value is around RR management.
Comments Received.
A few people raised some points that made it clear that there is more to this topic that needs exploring. Those comments fall into two broad categories. 1) If you fully optimise for the Fling toss, could it become better than playing for both options? 2) If you FFF, the pass to the Fling will be too long for it to be viable.
So, let’s explore.

Optimising for the Fling TTM Line
Let’s start by looking at how to maximise the pure TTM line. Can we get it so that it is a better option that the dual push/TTM option.
There are three things (apart from skills/stats) that can improve the Fling TTM odds. Ofc, these are relevant for all TTMs not just Humans TTMs, so worth considering if you can do them with other teams.
- Chain push the Fling forward; meaning he will be more likely to land in scoring range. This means at least one block, likely two to ensure he is not in a TZ when you do give him the ball. Risk/reward here depends on the effects on passing range to get the ball to the fling if he is further forward + the skills and strength of blocked/blocking pieces and their set up. Ideally you would chain him without using your Blitz. If you can toss from two squares inside the half, the Fling lands in range 95% of the time vs 84% from 1 square and is also likely to need fewer rushes.
- Clearing the landing zone. Using your Blitz action to knockdown or, at least push further away, one of the players positioned to contest the Fling landing. Into a contested landing zone a Fling will splat a defender ~5.3% of the time. Knocking the most relevant defender just one square further away drops that to ~2.3% (assuming the blitzer can also finish their move into a low splat probability square). If it is a pow then there will also be 8 squares fewer with TZs and some of those squares are high probability landing spots, so can add up to ~25% chance of not having that -1 on landing. The hard part here is your blitz is usually either a 1D or you need to put another of your pieces into a splatting square, which decreases the benefit.
Together these optimisations take a TTM from ~6% to ~6.5% when you have no RRs – part of the reason its not more is you are adding extra rolls for the blocks. However, with 2RRs they become much more useful, rising from ~20% to ~25% depending on defender set up, skills and Strength. If you are committing to the TTM line, you should weigh up RRs and skills and likely do at least one of these options.
For contrast a push OTT is slightly better at ~28% with 2RRs and if you try for the push first and then pivot to the TTM its ~30%.
But there is a third optimisation available:
Optimising Ball Transfer to the Fling
Even if you optimise the toss itself, the ball transfer is often the limiting factor.
This means positioning of the Thrower and positioning of any relay pieces in the backfield to reduce the range of any passes.

Kick Landing Location Odds
Let’s start with a fundamentally useful piece of info.
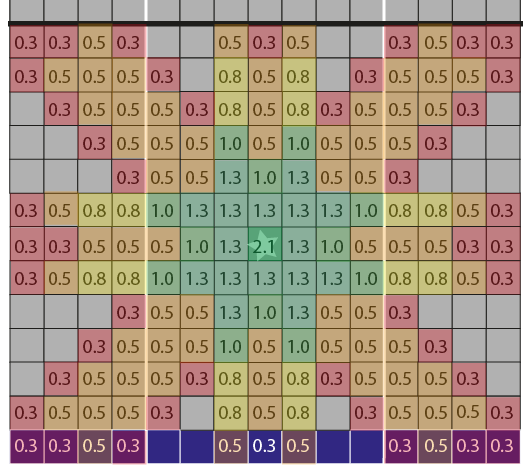
For a kick aimed at the sweetspot, these are the odds of different scatter ranges
- Touchback = 4.7%
- Lands on the targeted spot 2.1%,
- 0-1 square 12.5%
- 0-2 squares 29.2%
- 0-3 squares 45.8%
- 0-4 squares 62.5%
And here are the percentages for every square (not allowing for changing weather). Colour coded by likelihood.

What I wanted to do with this info is explore the best Thrower locations relative to relay Catchers and/or targets for OTTD.

Player Location – Fully Committing to the Fling Toss
In the setup below, I’ve put the Fling (purple) in the centre of the LOS. This location makes it easiest to get the ball to him but be aware that it does mean that you are likely taking 1 or more LOS hits and likely aren’t chaining him forward from here. If these hits are 2D with block vs no block then it is probably worth taking them anyway, especially on T8.
Yellow is the Thrower, Blue is two Catchers, Orange is two Ag3+ linos.

- Green locations need a pickup and handoff only; either (3)3 or 33. No rushes required. 64% of squares
- Yellow is one rush so (3)23 or 323. 11.6% of squares.
- Orange is either 2 rushes 3223 – or a 3+ pass and 3+ catch to the relay catcher followed by handoff to the fling; so (3)(3)(3)3. 19.2%
- There is also one square (0.3%, straight south) where you would need to do one rush to make a 3+ pass (3)2(3)(3)3.
You could slightly improve it further by having two more linos on the middle yellow square in line with the sweet spot to save one rush (0.3% x 16% better… not huge). Indeed, I think spare pieces should be around the sweet spot for the chance to catch the kickoff.
Ogre
The Ogre (not shown) should stand behind the Fling and move in front of him to toss. In this location, both of your critical pieces can be largely protected from a Charge or Perfect Defence kick off result.
Having the Fling in the centre of line in contact usually means you can’t make use of a Quick Snap, which is a shame and is a reasonable justification for putting him in the open. If you have two Flings then the Ogre goes centrally off the line and the Flings go on at the end of the central zone not touching anyone.
What this set up does for TTM calculations
Last week I made the following assumption in my calculations:
“The Fling also needs to catch the ball (3+ without Catch), and we need (3) pickup, (3) pass. Hopefully no relay required, since the Fling is standing on halfway. → ~52% for ball handling“
Now that I have the info above, we can work it out with a bit more precisely. With the set up above we get to about 60% for ball handling (including the touchback), which rises to about 72% with RR.
Therefore, the optimised kickoff positioning pushes the fully committed Fling toss line to about 6.5%. If you can combine with blitzing the landing zone and/or chaining the fling it could rise to ~7% with no RRs.
This would be just about in line with the 2D/2D/2D version of POTT through a tough backline, but it is still inferior to the dual option.

Player Location – Dual Option OTTD
The critique of the dual option (and even more so with FFF) is that you aren’t optimally set up to get the ball to the Fling. It is a fair point. You need the extra pieces for the chain push. For the set-up I discussed in the previous post, I hadn’t worked out all the odds, I was going primarily from the feels I had from working out the landing locations when I was writing about kicks in the Blood Bowl Strategy Guide Book + the requirement for the combined push and fling toss lines.
So, are you ready for an even more colourful diagram?
Again, the Yellow ring is the Thrower, this time set up 2 squares S of the sweetspot. Purple circle is an example of where the Fling would set up for a dual option OTTD, he needs to be on halfway somewhere for range considerations, and usually would be wider so you can set up your boxes and Ts in the middle for the POTT.
The Blue circle is where I suggest a relay Catcher would set up. The relay Catcher’s job is to be part of the push structure while also being positioned to receive the ball on most kick locations and then hand-off to the Fling after landing downfield. From the position shown he can reach all but 5.3% of the potential Fling landing locations. In those 5.3% of situations you could use the other Catcher that you were planning to chain forward if desired.
Again, precise locations might shift a little depending on defenders.

- Green = handoff, no rushes required range (3)(3): 33.9% of kicks
- Orange = either double rush or 3+ pass (3)22(3) or (3)(3)(3) 18% of kicks
- Yellow = single rush to handoff (3)2(3): 10% of kicks
The diagram looks a worse; there are more orange and red squares and fewer green. However, remember the middle squares are higher probability landing zones. Where we are compromising is out wide and very deep.
Overall we get to a point where (incl touchbacks) 67% Kicks are not too bad for getting the ball to the relay catcher, needing rolls of just 2s and 3s, mostly with built-in skill rerolls.
The sharp-eyed among you will have spotted some extra colours here:
- Purple in the NW squares are where you would likely respond to the kick location by committing fully to the Fling toss; either the Thrower rushes and passes (3)2(3)3 to the Fling or the relay Catcher picks up and hands off 33. (5.2% of kicks)
- Light Blue in the NE you instead would commit fully to the push play, again either passing with the Thrower (3)(3) or handing off with the relay Catcher 3(3). Note, for this reason it would be better to set up your chain pushes so the scoring Catcher goes in this direction if possible. (3.5% of kicks)
- Brown (1.3%) and some of the purple/blue squares are likely to be occupied by other players; I can’t plan this fully as it depends on LOS set up. These squares might force a pivot in plan if one of them catches it and would give you additional chances of a touchback.
- That leaves the “bad squares” (shades of red). There aren’t all that many of them: ~11% need 5+ passes and another ~12% need rushes for 4+ passes.
Together., this gives us ~52% ball to relay catcher successfully without using a team RR. +2.2% direct to fling and +3.6% direct to POTT.
If we look at the ball location and commit to either line before we move the ball, then the POTT pushes to about 65% as we can go directly to that Catcher on short kicks. Whereas the Fling needs an additional 3+ (67% / 88%) plus gets the 2.2% boost of going direct to Fling if it landed NW.
Overall, this means for the dual option set up, you can ultimately get the ball to the Fling ~48% of the time with 1x team RR, compared with 72% if you dedicate to the TTM. Quite a chunky difference. However, attempting the dual-option still gives an overall ~10/22/31% chance, which is higher than even the ball transfer optimised TTM.

My verdict
In short: if the kick and your available pieces allow it, the dual‑option OTTD remains the strongest line. FFF is a an option when the kick favours it. Optimising solely for the TTM makes it a viable line, but doesn’t mathematically beat the flexibility of being able to pivot.*
| Line | No RR | With 2RR | Notes |
|---|---|---|---|
| Pure TTM (baseline) | ~6% | ~20% | No chaining/blitz optimisation |
| Pure TTM (optimised) | ~6.5–7% | ~25% | Optimised ball transfer and with either chain or landing zone blitz |
| Push OTT | 7-10% | ~28% | Committed push line vs backline defence |
| Push→TTM pivot | 12-14% | ~30% | Try push first, pivot if needed |
| FFF | 12-13% | ~31% | Fling Fling First – decide after kick resolved |
*I fully acknowledge that if the ball lands deep and you fail a pass you might not have to make you will rue what might have been if you committed to the TTM and will blame me for failing to score. I accept this burden.
Other Tactics Posts you might like
Puzzles
You’ve got this far, you probably love BB and like solving BB puzzles…

Leave a Reply