

This puzzle comes from the NAF lusitanian Spring Cup round 6. My rats vs HEs. It’s T8, 1RR available and we want to score (obvs!)… but there are a wall of elves. Some ratting required. But what’s the best option?
It’s also raining, so the pick up will be a 3+ for the deep GR and the catch will be at -1 too (but we can’t modify those).
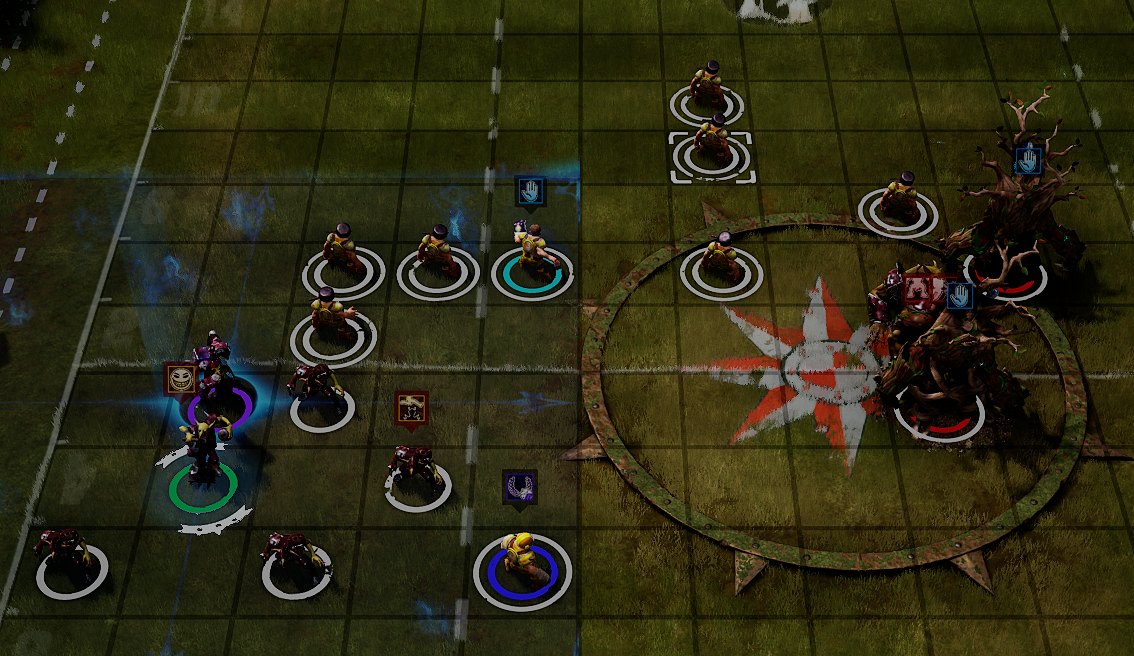
Zoomed in view of the main action below:


Red = Elves. White rings; wrestle, Yellow; dodge, OTB=on the ball. D1/2; dragon warriors (block), WL; white lions (wrestle)
Yellow = Rats. Z; blitzers (block, breaktackle, orange ring; tackle), GR; gutter runners (block, dodge), L; linos (white wrestle).

When do you move the ball?
The pass/catch sequence from GR to GR is 3/2/2/4/3 (15/38%) or 3/5/3 (14/35%) if you need to reroll the pick up and don’t want to risk the GR rush to reduce range.
This isn’t going to get better, but when do you do it?
Module ID attribute is required!
The reason I ask that is I’m interested in the mindset here.
The overall chance of scoring on this turn will end up quite low, single digit percentages most likely. The two hits have removal potential, there are 11 elves at present and any removal could help, especially if you fail to score and want to go for the aggro win. The hits are also quite low risk and the blitz will be needed anyway.
However, the counterpoint. The thrower at the back has on-the-ball, which means two extra points to consider. If you reveal your blitz location before moving the ball, the OTB move could allow the thrower to move to somewhere more annoying for the route to the line. However, if you wait to do the blitz until after the pass, the OTB move could put the player somewhere that means you can’t assist the blitz anymore, a quandary indeed.
As the rats, you could also move some pieces to stop the OTB reaching certain locations, so let’s ask question 2:
As HE, where would you want to put the OTB player?
If the rats move the ball before the blitz, where would you want to put the OTB player?

Thinking through the above question should help the decision about when (or who) to blitz. If he goes to A, B, D or E, then my blitz goes onto D2, if he goes to C or A, I will be going via L1. If he goes to F, G or H, I’ll be blocking the thrower 2D needing pushes+ (1/9) first and then going through L1 most likely depending on result. Realistically not moving might be best the option, but likely is hard to resist given that this sort of opportunity comes up frequently.
The route through to score
Let’s assume the OTB player doesn’t move. Who do you blitz and from which square? You can assume, if possible, you will assist/cancel to make it 2D. You have the Blitzer with tackle (Z) available so you can use him or the deeper blitzer/wrestle lino.

Were you correct? Let’s look at the options:
D2
Hitting D2 from square G, H or A (assisting from one of the others) is pretty similar.
On a push, you would try a (4432) to run the two TZ gauntlet down the line past the white lions. That dodge sequence is 35% without a team RR to back up the Dodge skill roll.
However, on a pow (47% because of steady footing) you push him back diagonally and then have either a 4+ leap over the downed player, followed by (3/2) to score. The leap option is 42/64%
A 1/9 on the block sucks, a bit, you now likely have to go through a (44332)2 (incl added rush), to go past L1 rather than down the sideline on a 4/5/4/3/2.
L1
Hitting L1 appeals a bit more as the 1/9 now is affected by wrestle. On that basis where we blitz from is more important. I like square D, where you cancel L4 and assist from E, as this leaves square F free to run through and saves a dodge whatever the outcome.
A pow OR push here (81%) and you can dodge through the vacated L1 square on a (4332), and on a pow you can leap on a 4(32) same as above, which is better if you have a RR available.
A 1/9 here and you can leap from F to North of L5 (4+) and then (332) to score (33%/55% w RR).
L1 is therefore better than D2
L2
You can 2D without any dodging dice from square C using players on halfway, and, as you are hitting wrestle there is a 75% chance the L2 player is on the ground.
The gate between L4 and L1 means that clearing L2 could make the dodges (2332) but adds 2 rushes yielding a total 30/48%.
Without those rushes, it would be better, but sadly we are just too far away. I’ve left it in as sometimes the less obvious option is worth considering.
The turn before when putting in scoring threats there was an option for having the GR further in-field. However, I also wanted to bring the other GR upfield after a pickup to remove the rush/pass action. I needed scoring threats in place before attempting that pickup, hence we don’t have the space.
So, now we know L1 is best blitz target does that change the OTB locations?
The OTB move to North or South of L1 makes 2Ding him impossible, which forces the play through the Dragon prince. Sounds good, but now the hit onto the Dragon Prince if a pow/stumbles, would leave just a 3+ leap, 2+ dodge to score. So, 46% of the time it is actually quite a lot worse to move the OTB there.

The other option would be S of L5. That forces a rush as we now need to assist from the square we would otherwise run through, so that a push result isn’t a disaster (see below)

On a push the GR has a (3332)2 route to the line, on a pow its just (332), both of which are better for the skaven than if the OTB did not move.
What happened?
I blitzed L1 before doing the ball movement and powed him NW. I then regretted it when I remembered about on-the-ball! However, I did remember about the OTB player before moving the ball, so I jammed in pieces to prevent him from occupying my route to the line. I did also take the ROgre 3D into 3D hit, risking the 1/27. Assists were positioned in a way that he wouldn’t eat his chum if he 1’d. I was trying to get something from the half as the odds of success were low even after the route was clear.
My opp did use OTB and, as above, that made his position slightly worse. I ended up leaping over L1. After the set up, the ball handling, leaps and rushes were a casual 3/2/2/4/3/3/(32)2… (7/21% with RR). Lovely. 1-1 HT.
I then was able to 8 turn the second half and went on to win 2-1.

Leave a Reply