
It’s all gone wrong. Our carefully orchestrated defence failed to generate the turnover or stop, your opponent stalled out and scored on T8/16. But we still have the one‑turn touchdown, and today we are going to focus on the most spectacular version. Tossing a Fling or Gnome.
The problem is that TTMs, while glorious, need dice rolls. Lots of them.
Most of these rolls are essential, failure ends the attempt. However, there is one roll you can choose to ignore: Take Root. Unlike the Ogre and Troll Negatraits, Trees don’t have to roll a 2+ to be able to chuck a little fella.


I’ve been playing Flings in the online Tiki League this season, and found myself wondering whether I should be rerolling rooted rolls on a OTTD. I figured there must be a point, a certain number of RRs available, where the value of the Tree stepping forward would be worth more than the value of having that one extra RR for the later rolls.
When I get ideas like this they tend to occupy my head until I work out the odds. Usually in the middle of the night. So, can open, worms everywhere, this post explores the stats. Strap in.
Before we go on, what’s your instinct:
The TLDR version is rerolling root is worth it when you have 4RRs available, usually worth it if you have 3 and becomes very condition dependent if you have 2. Or… “1, 2, Tree” if you want a one-and-done mantra.
Working out these stats also meant working out where the throws could land, so I ended up having the data that is relevant to different defence locations. These apply equally to any thrown team mate, so will be posted soon as a stand alone.
How much does a Take Root cost your chances?
One square of movement doesn’t sound like a lot, but when you’ve got little legs, every square counts.
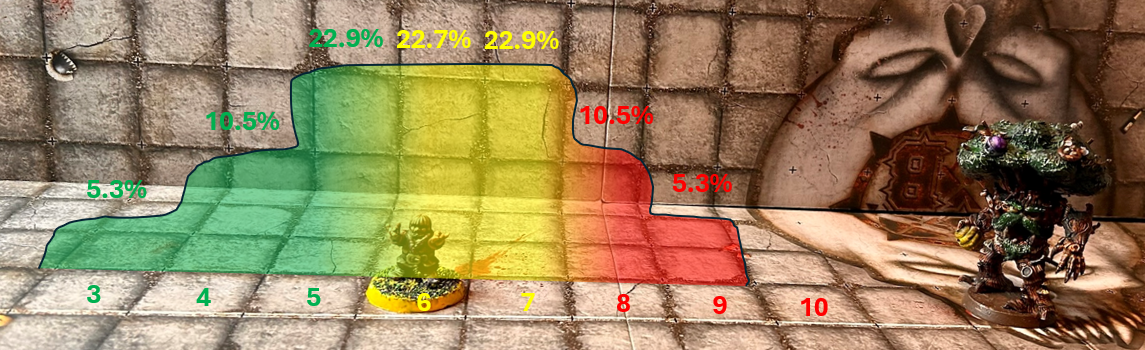
The pic below is the probabilities (top) and distances (bottom) if you are allowed to take the one step forward (not rooted) and are therefore targeting in-line with the sweet spot.

For MA5 piece there is ~39% of being in “no-rush required” range (green), ~46% chance of needing rushes (yellow) and ~16% of landing out of range (red). Don’t worry, there is also a table below with the numbers.
If you were rooted and unable to move forward, the target for the piece would be 7 squares away from the endzone, which moves the distribution curve to the right as follows:

As a result, the “out of range” squares increases by 22.9%.
Here is that in table form:
| Relative to Target Square | Distance to Endzone (Pass from Halfway) | Distance to Endzone (from +1 square) | Probability | Cumulative |
| +3 | 4 | 3 | 5.3% | 5.3% |
| +2 | 5 | 4 | 10.5% | 15.8% |
| +1 | 6 | 5 | 22.9% | 38.7% |
| 0 | 7 | 6 | 22.7% | 61.3% |
| 1 | 8 | 7 | 22.9% | 84.2% |
| 2 | 9 | 8 | 10.5% | 94.7% |
| 3 | 10 | 9 | 5.3% | 100.0% |
There is a clear advantage of taking at least one step.
If you can take that step, there is a 38.7% chance of landing a Fling/Gnome within MA5 (no rushes) of endzone and 84.2% of being within 2 rushes, compared with only 15.8% and 61.3% respectively if you don’t.
Don’t RR:
If we look at range + any resultant rushes independently from the pass/landing/dodges rolls, then tossing from halfway with no RRs is = 15.9% + (22.9% x 5/6) + (22.7% x 5/6 x 5/6) = 50.8% and If you keep one RR available for rushing, this rises to the headline stat we need = 59.2%
With RR
If we don’t root and take our step, then the odds become 73.5% for a MA5 fling, made up from (38.7% + (22.7% x 5/6) + (22.9% x 5/6 x 5/6).
So, to decide the value of attempting to RR take root, we can calculate the value of that roll allowing for the 1/6 of it succeeding = (5/6 x 73.5%) + (1/6 x 50.8%).
This gives an overall 69.8% of being successful for range portion of the TTM.
This is a ~10% increased probability of success by rerolling root.
Tree Maths
But, is 10% enough bump enough to justify RR?
To work that out, and the relative value of RRs in different parts of the sequence, we need to work out the likelihood of success of each roll and how much a RR helps each bit. I’ve broken it into “modules” so we can talk about the things that change the odds without it getting stupidly messy.

Ball Handling Module (pre-Tree)
It is almost always better to get the ball to the fling before you chuck him. However, we might have a decision here; whether to rush to reduce passing range or not.
A single 2+ rush for 3+ pass with 1RR is 90% overall. If you compare that with a 4+ pass with 1RR being available (75%) then there is clear 15% bump, meaning it is worth one rush.
A double rush to go from 4+ to 3+ drops the overall odds to 83% with 1RR, only a 8% bump over the 75%. This still is objectively better. However, the 8% you are gaining here isn’t as much as the value you get from having that RR for the other parts of the sequence. You have a lot of rolls still to come. So, if you have only one RR it is usually better to not do the rushes. Accept a 4+ pass.
If you have 2RRs, it depends on defensive set up (number of dodges required and where you are likely to land).
At 3RRs you are into the territory where you should usually get those little feet moving.
For the rest of the calculations, we can assume that the ball has been recovered and delivered to the eventual scorer safely. The decisions you make next are based on how many RRs you have at this point.

The Toss Module
On to the TTM dice. This comes after the root roll, but we need to know what we are saving our RR for.
On a toss of 6 squares for a Strong Arm Treeman: 1 = fumble, 2-4 = sub-par, 5+ = superb.
For the landing; no TZ is 3+ for superb or 4+ for sub-par. This gives a toss into an open square a success chance of 47.2% and landing in 1TZ is 40%.
You must RR a fumble of course (1/6), but should you RR a normal pass? This feels intuitively like you shouldn’t, but we’ll do those maths for completeness. You’re fishing for a 1-in-3 chance to convert your 50% landing to a 67% landing, but you could also lose all chance if you hit the 1/6. From the maths we’ve just worked out, it’s clear rerolling the pass (effectively starting again) gives you a 47.2% success chance vs the now secured 50% landing chance. So, intuition holds and the simple answer is; don’t RR a non superb pass.
Having worked out that we are only rerolling passing fumbles and failed landings we can calculate that with one RR available our overall odds of making the toss and landing become ~75% (22% bump over no RRs) and with 2 rerolls it becomes 78.3% (3% bump vs 1 RR).

The Dodge Module
We also have to consider the route to the line after the Stunty lands. This will usually involve some Stunty dodging. Indeed, against a standard TTM defence you likely will need at least 3 dodges to get through the backline and possibly a fourth to get away from where you land.
So, what scale of bump do we get if, in addition to Dodge skill, we also have team RRs available?
For 3 Dodges =
- 59% with Dodge only,
- 69% with 1RR (10% bump),
- 70% with 2RR (only 1% bump vs 1RR).
Combining the post-throw modules…
All the pass, landing and dodge rolls happen after the take root roll. So, to make our “accept root” vs “reroll root” decision we need to calculate the combined success rate bump for having 1+ RRs when we need to do all the post-root rolls.
I’ve simplified this to two reasonable situations. The point here is that you need to evaluate the field state and opposition positioning as part of the decision about how many RRs to keep.
Scenario 1. Vs Non prepared/sub optimal defence. This might happen if you’ve beat up your opponent (or fouled-up) or if they need to defend against a pushes one turn thanks to your star player. This assumes passing into the open anticipating a non-superb pass and needing 2 dodges. 2+ pass, 4+ landing, 2x 3+ Dodges
- 31% no RRs,
- 53% 1RR
- 57% 2RRs
- 58% 3RRs
Scenario 2, More common. Passing into a prepared defence where you are likely to land in 1TZ and need 3 dodges. 2+ pass, 5+ landing, 3x 3+ Dodges
- 16% no RRs
- 33% 1RR
- 37% 2RR
- 38% 3RRs.
Clearly much harder, but it’s the effect of RRs that we are most interested in.
In both situations the bump from 0 to 1RR is extremely valuable, whereas 1RR to 2RRs is quite small ~4% and the next bump from 2 to 3RRs becomes very minimal.

Skill modifiers
Before we say that RR root is worth it, we need to think about skills.
Dodge / no Dodge
Gnomes don’t have dodge as standard, so their dancing through the backline will rely on team RRs. Quite simply, if there will be dodges to do, you push RR root further down (#5+) on your priority list.
Sprint.
Fling Catchers start with Sprint. With Sprint a halfway line toss had 84.2% of being in range, but with the final 22.9% of that you are making 3 rushes to the line.
In this situation the combined odds when comparing being rooted and making the range + any rushes rises to 79% vs 77% if you reroll the root and don’t keep that same RR for rushes. This isn’t too surprising, you end up essentially spending a RR for a 1/6 root roll that most frequently only saves you from a different 1/6 rush roll.
So, if you’re flinging a Fling Catcher, then the rooted RR becomes very low priority (RR #4?). This little set of calculations tells you it is important to protect your catchers (or that sprint is worth keeping as random on a Gnome).


Loner.
Clearly an OWA Tree with Loner 4+ is 50% to waste the RR on attempted root. This takes the net EV bump of the root RR to only 5%, which makes it roughly in line with the second RR for the pass, dodges and rushes… but it would also feel worse to fail! Most likely this means that RR of root drops to at best the third, and more likely fourth priority… it’s not that likely an OWA team will have enough RRs for this. Sorry Tree, you’re going nowhere.
Sure Feet.
This one gets a little bit complicated. On the face of it, anything that makes the fling actions easier make the RR of the root relatively more valuable. However, if you’ve taken Sure Feet as a chosen skill, then it likely is on a Catcher, so we’ll look at sprint + surefeet. Here the stay rooted option (keeping RR for rushes) reaches 81% (don’t get excited that’s just the movement part), but if you RR Take Root is goes to 89%. An 8% bump. The Root RR is not quite as good as in non-sprint, non-surefeet situations but better than sprint only. It becomes worth considering as RR 2 or 3 depending on how hard the landing/dodges look.
Bullseye.
On a superb throw, the fling lands where you aim. This is clearly good as you can aim away from a TZ. The caveat is that for a fling you will have at least one rush to the line, and two if you are rooted. As it only helps the superb pass branch, (see what I did there) of the passing calculations, it doesn’t change the advice around rerolling take root. We’ll look at aiming shortly.
Other skills and stat ups.
Quite simply, anything that makes the throw, landing, dodges more likely to succeed increases the value of getting into range, so more value to RR root. +MA or anything in play that would make the landing / dodges / rushes harder (tails, tackle etc, snowing, moles) then there is less value of RR root.
Where to target your TTM
Ideally, we want to land in as few TZs as possible (obviously) and reduce our number of dodges required (also obviously). To work out where we target, we need to know the probability of different scatter locations relative to the target square.
So, let’s do that.

From the heatmap, you can quickly tell that 47% of the time your fling ends up within 1 square of the target, or on the target itself. This is useful to know fundamentally as it’s the same odds for when you are use flings, snots and gobbos as missiles into cages, and is the same distribution for an inaccurate pass (before the ground bounce).
The other thing to note is that if your target is next to (not on) a player, then there is 5.3% you will hit that player, and 23.4% chance of being in that player’s TZ.

That’s all fine, can we make it better?
I wondered if it was worth the risk of being closer to the sideline. In the diagram below I’ve positioned the defenders in pretty standard TTM defence locations and aimed 3 squares in from the sideline.

Here we have 5.4% for going off the pitch (not bad), 2.3% of hitting the defender, so 7.7% of TTM OTTD instantly over (this 1.4% worse than the 5.3% above). But, it is 18.2% of being next to the defender in the landing area (5.2% better). The 4% of being next to the backline defenders is almost the same if the target square was one to the right (4.2%).
The 5.2% chance of not being next to defender translates into landing of a subpar throw on a 4+ (75% w/RR) vs 5+ (55.5% w/RR) and having to do at least one, possibly two fewer dodges, probably about ~43% overall assuming you have to do the backline dodges as well. There are a lot of assumptions here. What this means is that the one square left throw is getting ~5.2% improvement of being in ~30% better landing location; i.e. ~1.6% gain. This is quite similar to what you lose in terms of potential of splatting or going into the crowd. So, it is viable but not much better except when the putative landing location is busier…. the decision will be modified by defender positioning. Note that this also tells you about the value of blitzing that piece away if he’s in range.

Should we chain the receiver forward?
Yes, we should, if we can relatively easily (i.e. without needing rushes, or doing blockless 2D blocks or moving the player such that your pass/hand off is much more difficult).
If the receiver is one square downfield then the Tree can take two steps and chuck him, but can also be set up so that they could still chuck him even if rooted. So, if we can get the chain and we’re not risking having it in a TZ it will definitely be worth it.
Note: a big change in the 2025 rules is that you can pass and TTM in the same turn. Pre-2025, set ups were all about optimising the likelihood of getting the ball to the catcher, now we can be less concerned with that. It’s always on.
Usually with a Fling team you are either doing a blockless hit with player from your team or a loner hit (possibly 3D) with a star player, hopefully with block. The value of the risk of that block here is pretty obvious, an extra square downfield is huge in terms of ensuring being in range and possibly reducing dodges, and there is attrition potential which could be valuable for the second half.
It is a nuanced decision that, again, is dependent on how many RRs are available. Ordering wise, it would be nice to move the ball first to give clarity on how many RRs you have available, but the set up for a chain forward might not allow that. It is possible of course, to have a fling positioned on the halfway line that is option 1 if the chain doesn’t give a pow and option 2 that is chained forward.
Below is what that set up could look like.


The decision on whether to try the chain push or not depends on ball location and what’s on the line. For example, in the formation above, on a deep kick one of the Hefties could recover and pass to the central fling as a relay piece. The wide flings could fill in the box behind the central tree and the star could blitz. If the ball was elsewhere, different pieces would move into the box.

The corner blitz from the star would then chain the central catcher forward one square, and the LOS tree could then do a 3D to punch away the Lino next to him. Then you hand off to the forward catcher and the left tree can take 2 steps forward and chuck him. No need to RR pows on either block, and you have option 2 catcher next to the left tree if needed if you bothdown the hit.
On the face of it, you’re adding a (probably loner) 2D with block (1/36), and non-loner 3D so that the TTM throw is always in range and also likely to need fewer 1/6 rushes. But you are also perhaps compromising a little in terms of options for ball recovery and relaying. A kick to the corner is going to be tough either way though.
This set up is a little vulnerable to solid D kick-off result, but as are most TTM set ups.
This set up can also make full use of a quick snap, which is nice.


Practical Advice – When should you reroll root?
That’s a lot of stats, and not something you want to work out over the board. So, let’s try to boil it down:
- If you have one RR only, don’t RR Take Root, it has greatest value on the landing and dodges.
- If you are using a standard fling without sprint and have 2RR, then you can justify rerolling the Take Root if you know you won’t have more than three dodges.
- If you are using a catcher, or have a hard route to the line then only RR root if you have 2+ RRs.
One RR? Save it for the fling. Two? depends on route Three? Tree.
And the main message, if you want the TTM to be viable, don’t throw away all your RRs!
Comments?
Where should the defence be – post coming soon – check back for updates.
What have I missed?
Other things you might like:
Leave a Reply