
Over the past four posts we’ve looked at pressure, pitch control, protecting and attacking the ball. I decided to wrap up this section by looking at a common situation that comes up in most games – the ball-carrier in base contact with at least one defender.
The reason I think this is worth a post to itself is that I’ve found that newer players tend to use basing the ball as a strategy on its own, when they don’t have a better plan. And that’s understandable, sometimes it works!
The logic is obvious. If you’re standing next to the ball, your opponent has to do something about it. They have to block or blitz you clear, dodge out, hand off, or find some other way to solve the problem before they can continue their drive. Any of those actions can fail, and directly or indirectly lead to the ball on the ground.
Like we said last week, getting your opponent to mess up is one way to get the ball off them!
However, many coaches overestimate the pressure it creates (possibly because when it works you get some positive reinforcement and we tend to remember dramatic but rare events more).
This overestimation has led to a running joke/meme in the community:
“Ball-based; game over.”
The reason this is a joke rather than serious commentary is because merely plonking a piece next to the ball carrier is rarely enough. The phrase is usually made after someone exerts a disproportionate amount of effort/resource into getting someone onto the ball… but where the position is easily solved.
But like most Blood Bowl “jokes”, there Is a grain of truth beneath the sarcasm. Basing the ball carrier isn’t automatically good, and it isn’t automatically bad. Like everything it’s context dependent.
Rather than asking whether you should base the ball, the better question is: what problem are you creating, and how hard is it for your opponent to solve?
That’s what we’ll explore in this post, both from the perspective of applying pressure and from the perspective of escaping from that pressure.

What value can you get from basing the ball-carrier?
Force a Response
As noted above, this is the simplest reason; basing the ball forces your opponent to deal with a problem. The value comes from the fact that the solution to the problem carry some chance of failure.
The downside is that not all problems are equally difficult to solve. If your opponent can remove the marker with a routine block and continue their turn exactly as planned, then the pressure you’ve created is minimal.
It will work sometimes, and if this is the only option then go for it. But realistically, if you are giving up a 2D block with Block vs a non block piece, then you are hoping for a 3% fail state where they will use a RR or 1/1296 that they’ll roll quad skulls. So don’t expect miracles. If the problem is an easy solve then you are probably just exposing pieces for no real value.
Control the Blitz and Restrict Movement
Basing the ball carrier can provide a key strategic value beyond the chance to get lucky: it can control the blitz.
By placing a player next to the ball, you can effectively ensure that your superstar or fragile players are less likely to be targeted when there’s a more pressing threat that needs to be dealt with.
If they are blitzing next to the ball that means they are not blitzing a hole in your screen.
The control aspect of defining where the blitz will be can be used to slow down your opponent from progressing down the pitch. when you combine a based rear cage corner with a column or chevron defence in front then progress can be stalled for a turn.
Recover Tempo
One important turn of soaking up a hit near the ball might also be enough to buy you the time to get back into defensive shape, rescuing drive tempo.
Of course, this strat only works if your opponent sees the pressure as being relevant.
For example, if the ball carrier doesn’t need to advance that turn, then they could decide the basing player isn’t enough of a threat, and use the ball carrier to make a block, saving their blitz for something more impactful, or only blitzing if the block fails. In this situation, you are not only not controlling the blitz but also giving up a free hit.

What makes a Good Basing Piece?
While just plonking any piece next to the ball carrier does something, the more annoying that piece is, the harder it is to get them down/away, the more likely it is that the strategy will yield some benefit.
Important point: defining why you are basing the ball carrier allows you to assign the correct resource to the task.
If my goal is to control the blitz, then the basing piece will be low value. If it is to stall momentum or to try to force action then I want skills that make that more likely to succeed.
Two skills are powerful when basing up to maximise pressure:
Stand Firm allows a player to plant themselves next to the ball and refuse to be pushed, often forcing the ball carrier to dodge or at least move away after downing the marker.
Side Step, on the other hand, complicates your opponent’s blocking plan. If faced with a “Stepper” you’ll need to consider and likely cover the square(s) that the player could be pushed into and still be in contact or where they can be annoying.
Foul Appearance synergises well with these skills, making Nurgle Bloaters and Necromantic Wraiths particularly irksome!
If you can combine those with skills that make a piece hard to knockdown (Block Dodge, Steady Footing), or higher Strength, or skills that affect dodging, like Tackle, Diving Tackle, Prehensile Tail, Tentacles and Monstrous Mouth, and even Shadowing, then the value of basing can increase as it imposes greater limitations on options by making it harder for the ball carrier to escape.

If the piece is sticky, squelchy, or stubborn then they can be good candidates for basing up.

Solving the problem… options for getting away from based cages
Dodge Away
The most obvious option but not necessarily the best choice. I put it first on the list as your thought process should start here and then think “can I do better”?
Even an Elf dodging on a 2+ and using a reroll or Dodge skill fails 1 time in 36 including the RR. Compare that to a 2D blitz with Block and with a RR available, which has a failure state of 1 in 1296. Even a blockless 2D with reroll is 1/81 and worth considering.
In practical terms therefore the thought process should usually first involve asking “can I block/blitz away the tagging player?” Then, if the answer is yes, “would blitzing them give up too much momentum?”
Blitz away the marking pieces
A single player on the ball isn’t complicated. If they have side step, then fill any annoying square they will step to and bang them away. If they are isolated, you often can make it 3D and as it might be your only hit that turn, then use your “killer”, your MB, Tackle, Claw, Frenzy piece (although don’t use your Loner, Nega-trait Big Guy!).
If blitzing away one player is easy, then the obvious improvement is to tag the ball with more than one marker.
Don’t panic and pivot straight to dodging when you see this, there often is an easy solution.
Chain-Push the Ball Carrier Free
You can do this by pushing away the marking pieces OR by chaining the ball carrier away from the defenders. Let’s look at the shapes…
Adjacent Pieces
Two players side by side might look solid, but it is the easiest to solve. You just need to move one piece to fill the box and then blitz onto either of the box corners to chain out either the other defender or the ball carrier.
If the hit isn’t a pow, then your carrier is still based of course.

In the scene above the DE (Pink) have blitzed down the cage corner and jammed two pieces onto the ball carrier. The Tomb Kings solve is quite easy. Just fill the square above the ball carrier and then blitz on the corner.

The best outcome of that blitz is a Pow/defender stumbles (2D = 56%), in which case we’d push into the other DE piece and force it away (first pic below). However, if we rolled pushes then we could either push on the same angle and punch with the ball carrier or we could push the ball carrier and use on of the non activated other cage corners to block again.
The second hit would just need pushes or better and we could recycle to the middle of the field.


Note here that the rest of the Elves are out front; the TKs aren’t going to make much forward progress this turn. So although it’s easy to solve the based-ball problem there may have been value.
When double-basing the ball, the best plan is to avoid connecting your players too closely. If you have the choice, position them so they’re not adjacent to each other.
This makes it harder for your opponent to remove multiple tagging pieces with a single action.
Non adjacent tagging pieces.
This is less likely to occur from a position where the player was caged up. However, if there had been a turnover on the previous turn or a player was in the open when the tagging pieces moved in, then there might be more options for which squares to occupy.
If you are tagged in a way where you can’t fill a box to chain both defending pieces, then perhaps you can look to form a T-shape to chain out the ball carrier.
Example below, the DE have a piece NW and E of the ball carrier. Hopefully you can spot the chain-out option?

We could complete the T-shape by moving a piece to the West of the ball carrier and then blitz in the side. On a pow, the ball carrier is free to move.


Or we could box-fill. Moving two pieces below the marking piece so that we can blitz into the corner and chain the ball carrier out that way (after moving the piece blocking the chain). In the pic below the Blitzing piece is coming in from the NE. This option has used two activations before the blitz action, which makes it a little less appealing but might be contextually better depending on the rest of the board state.


Which one to choose depends on where you want to reposition the cage AND what would you do if you rolled pushes.
And that’s an important point:
When planning chain-out turns; you need to think through both pow and push options and what the rest of the turn looks like (and whether you would reroll the block dice).
Ball-Carrier Blitz
But what if you can’t chain someone free at all? Another option that doesn’t rely on a dodge might be to Blitz using the ball carrier.
In the next pic, the DE have done a better job in tagging the ball. They have both players in (NE and NW) and, importantly, have also covered the angles needed to chain the players away or to chain the ball carrier free.

So now we need to compare a blitz out vs a dodge. If we stand the downed player and put another piece in to cancel the NW lino, then we can have a 2D Blitz action with the ball carrier.

To get free, we need to roll a pow/stumbles (55%), otherwise it would require a dodge either from the original spot or after following up the blitz. For TKs, that would be a 4+ dodge. If they wanted to take it; the prudent move might be to stay and jam in defensive pieces.
Faced with this situation, before I rolled any dice I would decide where I would put in any team RRs. That decision would depend on how RRs were available and where I needed the ball to get to.
Once I had made the decision about which option to take, I would start to think about the fail state. Specifically, and especially against Elves, I’d ask where I was going to fall over if I failed the dodge or the blitz action and what could be done to mitigate the impact. What safe moves could be made to ensure that IF the ball carrier went down there would be multiple tacklezones near the position.
Below I’ve played out the same situation, but this time rolled pushes and failed the dodge. Prior to making the blitz I jammed the four Tomb Guardians forward into contact points so that when the dodge (inevitably!) failed there was some S5 muscle for the Elves to deal with.

Moving the pieces to cover failure might limit our options following success, so, as always, balance risk vs reward vs board state and what is needed. These sorts of high-level multi-fail state coverage decisions take time to master.
Hand-off out of contact
Before we move on from getting out of a based-cage scenario remember that handing off might also be an option.
If your ball carrier is based and you can’t clear it or the dodges out are tricky then sometimes the best option is to hand off* to a cage corner piece (possibly after clearing a route for that piece). This is always worth looking for when you can’t solve the based-carrier problem.
*A Thrower with 2+ passing skill might also consider a -1 marking modifier pass as not too bad and choose to pass out of contact, it could even be the safest option if they have Pass but no team RRs remaining. Worth remembering.
Indeed, as you get more experienced at playing a team, you will get better at identifying when an “all-in base-everything turn” is coming and then ensure that the cage corners are viable receiving options.
Example
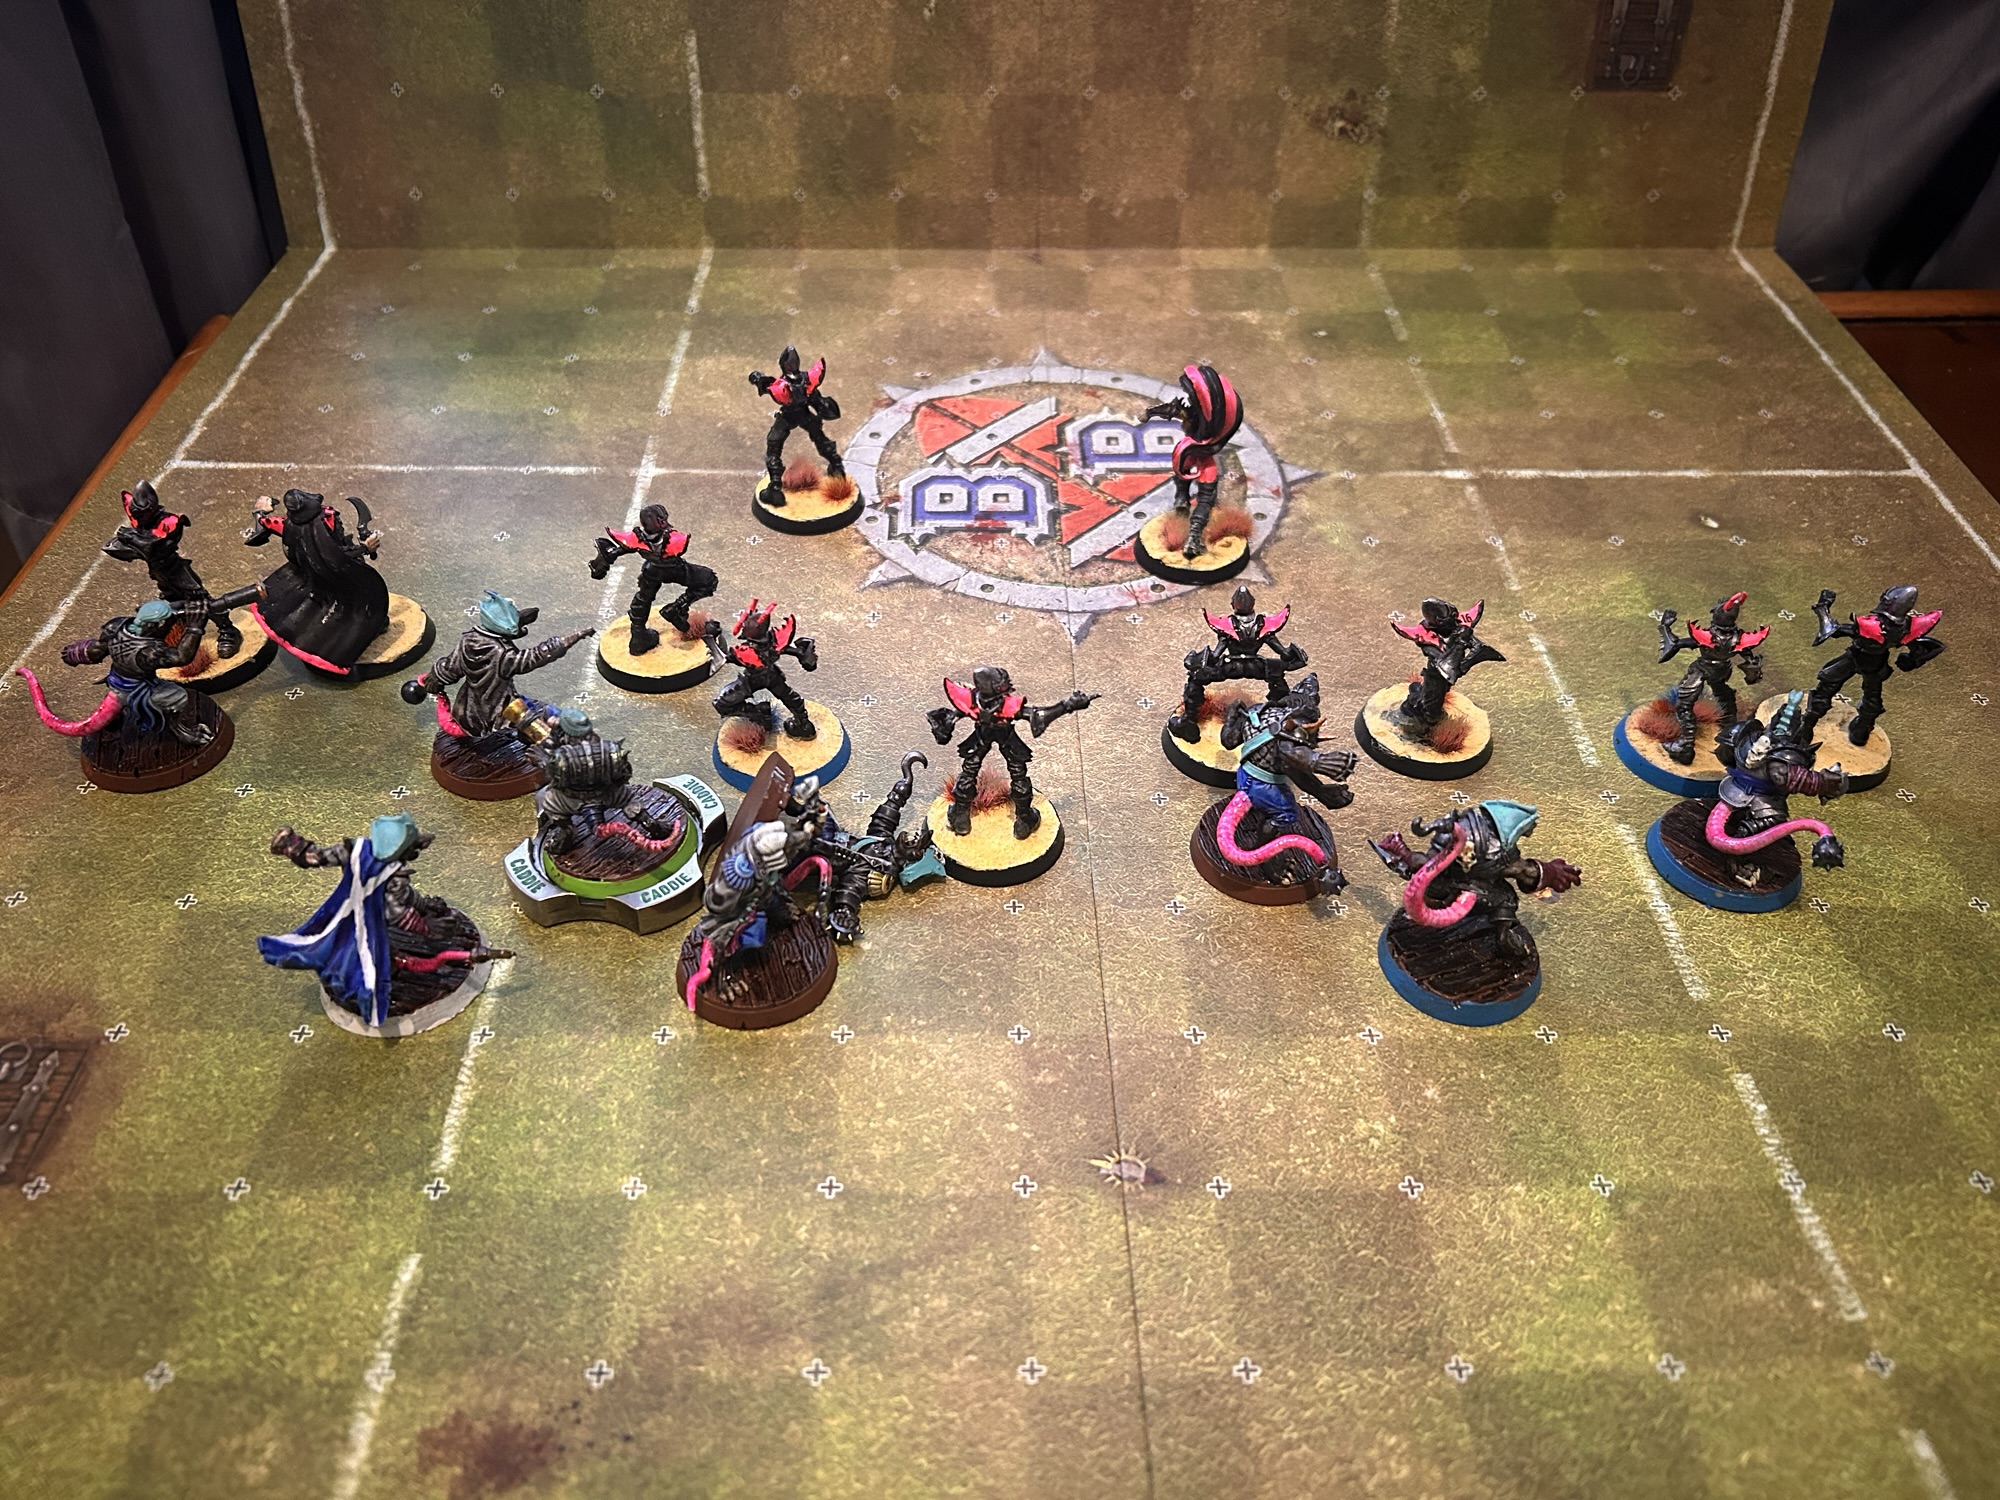
In the pic below I’ve switched out the TKs for Skaven, as this is an approach I use a lot while playing with rats.
The relevant difference here is that Gutter Runners have Ag2+, so mean the hand-off option has better success potential than the pass.
The position below looks fine, but if I was the Dark Elf player here, I might decide that now is the time to go all-in and pivot to a pressure game.

Anticipating that an “all-in” turn was approaching, I’ve cycled around the Gutter Runner (Scottish flag cloak, SW of the ball carrier) so that IF the DE bring the heat he is hard to tag, and I have a hand-off option. You can see that playing out below.

With the rats to play, they could:
- stand up and blitz off the player marking the ball carrier and re-cage somewhere else with the GR and free Blitzer as the front cage corner. But that involves going backward.
- Hand off to the GR and work from there.
- There’s also a chain-push option…, did/can you spot it?
Three choices, all reasonable. Deciding between them is about turn number, score, number of RRs and all the other stuff going on in the game.
All-in Danger
Before we wrap this one up, I just wanted to highlight that bringing pressure isn’t always the answer. Apart from getting your team pounded, you might also give up more space than you intended.
If you have pivoted from a screen to a contact turn, the danger is that you might have left a single blitz/block hole that can then be run through. Remember, if you make an opponent desperate, a 1D needing pushes or better (67%) suddenly might become the best solution.
We’re going to start talking about ball handling in the next few posts, but here I just want to highlight Nerves of Steel (NoS), a starting skill on Elven Union Catchers. NoS allows the piece to ignore marking modifiers when catching or passing the ball.
If you’ve tagged up the ball carrier and all cage corners but one of them has NoS, then the option to hand-off to that player and then blitz through their defender is something to consider. That M8 piece might be well gone before you realise there was even that play available.
Ball based = game over but this time the “in” team are the ones whose game is over.

Above, the Elven Union Thrower (Leader, Pink), is double based but even though the Catcher to the NW is double tagged he has NoS and Catch so it’s just a 2+ with skill reroll to catch the ball. Then it would just be a case of tagging one of the Linos and a 1D blitz to go through. Even with a push it would just be a 3+, 2+ dodge and then probably a couple of rushes and he’s out of range.

The Wrap
I hope there’s been something useful in here for you.
Pressure is a big part of Blood Bowl, and the more deliberately you apply it, the more the game opens up. Similarly the better you get a seeing how best to relieve pressure the easier you’ll find the game.
Next week we’ll talk about a topic where lots of people have opinions… stalling.

Leave a Reply