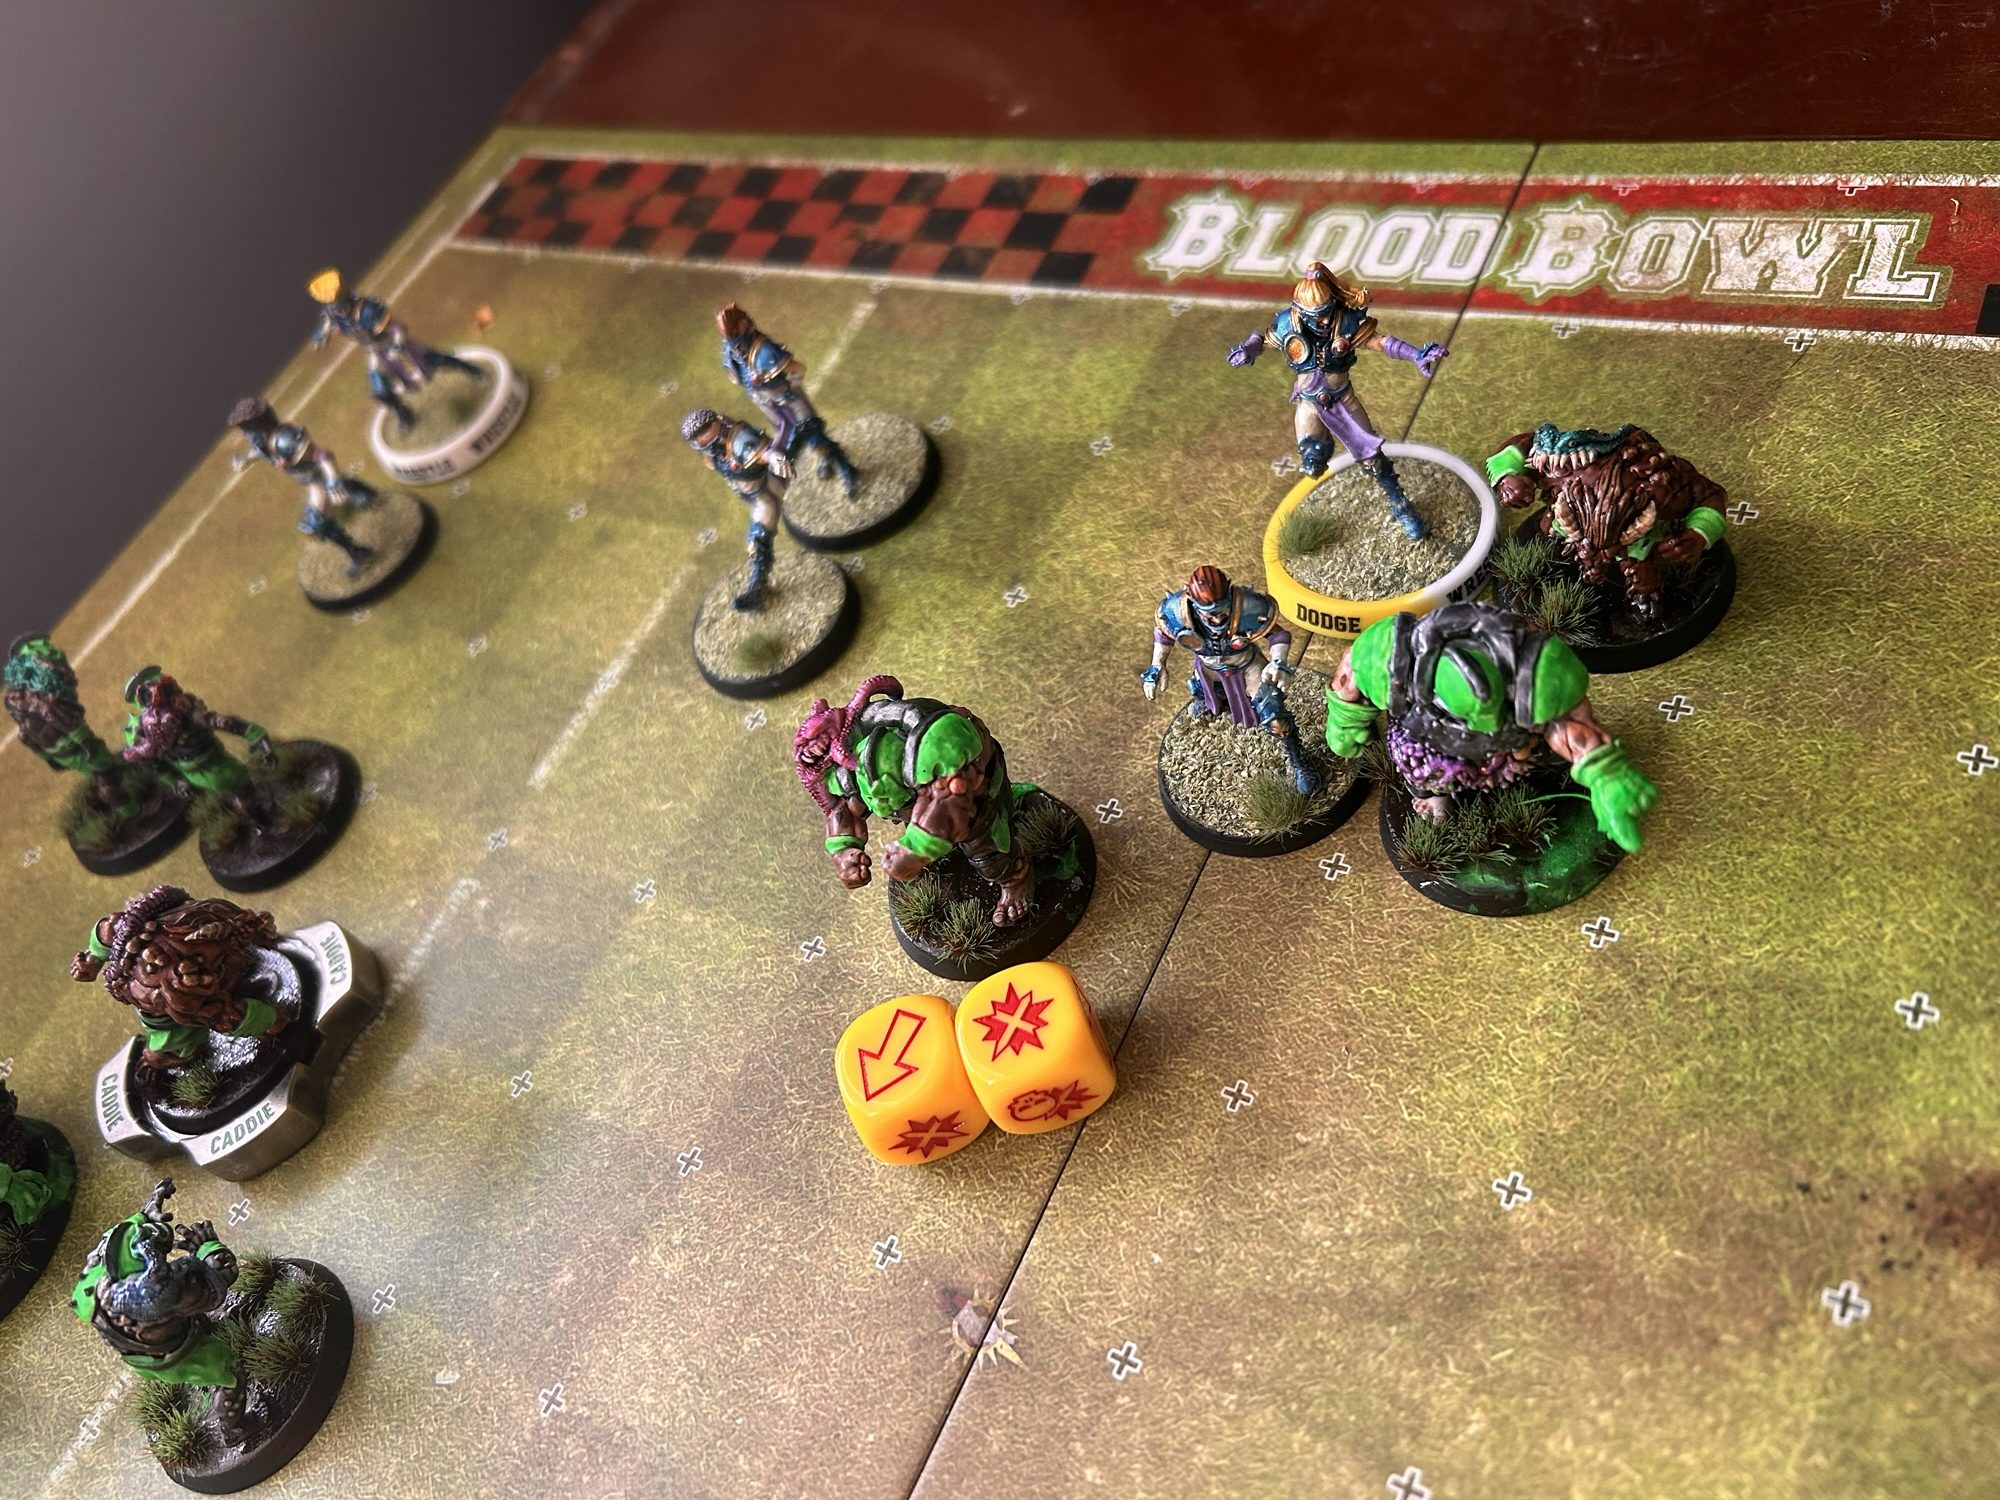

Getting better at Blood Bowl is a lot about pattern recognition and reproducing common shapes. This post deals with defensive formations in open play.
(video version at end of post – jump straight to it via this link
As a player, you can control the movement options of your opponent by constructing overlapping Tackle zones (TZs).
Quite obviously, the harder it is for an opponent player to move through a specific route, the less likely they will be willing to risk it…. we’re back to risk vs reward decisions. If the reward of a hard dodge is a hit on a ball, then a 33% dodge with RR available might be attractive, whereas if that dodge is just to get a player back into play, then they might choose to not go anywhere.

Screening basics
The simplest connection between players is the basic screen. Two pieces separated by two squares, each piece providing one TZ on a square, so there is no way through without having to dodge into at least one TZ and then out again on the other side.
Using more pieces and only having a single square between them means that single square now has two TZs and is much less appealing to dodge into.

Using the screening approach, you can cover the entire width of the field with TZs using only five pieces.
Screens are used throughout the game; usually not to cover the whole pitch, but rather to prevent access to certain areas. They can be used to protect the ball carrier or to stop a hit on one of your valuable but fragile pieces.

When creating a screen at an angle, you should watch out for creating a gate.
These are exactly what they sound like: two pieces positioned on a straight diagonal in a way that it would only take a single dodge to go through, and that dodge doesn’t have any negative modifiers from TZs on it.

Offsetting your pieces just by one square closes the gate and is much more effective at denying space.

Just in case the pic isn’t clear, here’s the same idea in diagram form. White arrows represent free movement, red is a dodge at -1, yellow is an unmodified dodge. Even though the connection between the piece on the left is two squares from the middle, they are connected such that the Orc would need to dodge from one TZ into another to get through. In contrast the gate option allows the Orc to move into the TZ for free and then do an unmodified dodge out (3+ for an Orc Thrower/Blitzer/Lino).
Takeaway:
Get into the habit of connecting your players to one another, look for ways to increase those connections.

Columns
The problem with screens like the ones above is that a single hit could create a hole. Knocking down or even just pushing at the appropriate angle can let players through a single point of weakness.
If you have higher strength pieces available (especially with Stand Firm, like the Nurgle Bloaters above), or pieces with Side Step, then these players can discourage a player from trying to break through a single screen. If not, then consider the more developed next option… a column.
The column is a two layered version of the screen, here the second layer is positioned in the row behind the initial screen directly in line one or two squares back, traditionally known as “Elf columns” as Elves have 2+ dodging and a baseline desire to avoid combat, so often adopt a variant of this formation.

The column defence clearly uses more pieces than a one-layer screen but has the advantage that it protects against a single blitz creating a hole in the formation. In addition, if a player does want to dodge through, then the column version makes the dodging player make more and often harder dodges than even a tight screen.
The two-layer approach also affords you a chance to control who your opponent will blitz.
For example, in the version above the front line has skills that would help an Elf stay on its feet (Block/Dodge) or skills that make an Elf less attractive to Blitz (Sidestep, Wrestle). This is good for slowing down an opponent but does risk a skilled player getting hurt.
Conversely, you could do the opposite; putting unskilled Line Elves at the front to keep your positionals and skilled players safe.
Who you place at the front and when in a drive depends, you guessed it, on board and game state, turn number or point in the drive. However, I think it is valuable to start appreciating that you can often at least partially control who/where your opponent is likely to blitz.

For an AG3+ piece, rolling 4/4/3 adds up to 1 in 6 chance before rerolls. An alternative option of a leap over the downed player might also be possible (more on this shortly).
Whether it is better for the layers of the column to be close together (tight columns, as in the diagram) or separated by a gap (below) depends on what players you are up against, what turn/phase of the drive it is, and how much space you want to give up.

Tight columns means the opponent can’t take much forward movement, they can punch a front player and gain one square only. This is good in the middle phases of a drive if you want to slow them down. Tight columns also make the individual dodges harder.
Deeper makes the opponent make more dodges to get through. Therefore, when playing against players with the Stunty trait (Halflings, Goblins, Gnomes, Snotlings, Lizardmen Skinks), the columns are better spread deeper as these players can ignore TZs.
Deeper also make a leap over a downed player harder (we’ll cover this below). So the spread option is more likely to be optimal on the turns when your opponent is likely to try and break through to score.

Chevrons
Chevrons are a variation on columns that essentially achieves a similar result and is almost interchangeable in many scenarios but can have some advantages.
Here instead of directly behind, the two lines are offset by a square making half arrowheads.

This formation has one obvious advantage; it protects against a Frenzy surf of the end player. However, to retain the purpose of this formation, of stopping the single blitz from creating a hole, the sideline end might need to be doubled up (as in the diagram above)
The more subtle advantage of chevrons comes from making the formation slightly wider and slightly harder to chain-push a gap. Filling the T shape on the end of the line requires a piece with more movement available and ultimately would block your progress path.

Bracketing
Bracketing is about controlling individual pieces’ movement. For example, if a player has broken through and is now a scoring threat, then you might want to make it harder for them to receive a pass or to dart into the endzone.
It involves placing TZs on either side of an opposing player and usually directly tagging them as well. These combined TZs make their escape harder and change the risk profile of their actions (and likely change your opponent’s turn ordering/decisions).

You can bracket in contact (left side of the pic). However, you can achieve the same effect by covering the destination squares (right side of the pic). This second option is especially useful when using low-strength or fragile players to control the movement of higher strength pieces. In the pic I’ve used Nurgle (as I had them out for the other pics). In this situation, if we put one of the Rotters in to mark, then it might become tempting to blitz through that Rotter after cancelling the defensive assist. A better example would be Lizards and Skinks or BOs and Goblins where the player touching could be strong and hard to move while the dissociated players could be S2 and easy to blitz through.
A dissociated bracket can also can increase the number of dodges required to get free in that direction, effectively forcing a different/longer route.


Breaking Through Columns and Chevrons
When faced with columns it can sometimes feel hard to make meaningful progress. In fairness, that is the whole point of the formation! But what can you do?
Width
The first bit of advice is to force the defence to cover the whole width of the pitch. Don’t let yourself get funnelled into an ever-narrowing channel. Instead, claim the centre and move your ball protection crew to that area while having some additional options wider. A wider threat forces your opposition to use more players to complete their screen and that can become an issue after removals deplete their resources or even if you can pick up some stuns for a temporary numerical advantage.
Get Behind
Second, if an opportunity presents itself to send a player or two around the sides while maintaining ball security this can prove useful. The deep player can become a distraction piece to pull defenders out of position, or can be a legitimate scoring threat, or can wrap around and provide assists from the rear of the screen where needed.
There is, of course, a danger. If you send players around without simultaneously exerting pressure elsewhere, then there might not be any impediment to your opponent picking them off.
Press
Third, if you out-strength or can out-Guard a section of your opponent’s screen and have enough turns to take it quite slow, then you can press into the weaker players. This will force them into one of two actions: either committing lots of pieces to get hits on your pressing pieces, or forcing them to dodge off.
The best targets for this sort of strategy are opposition pieces without Dodge, or with low Ag, and without combat oriented skills. The more pieces you can safely press into, the better, as your goal is to get them to be unlucky on a failed dodge early, or, second best, to burn some team RRs.
Note that as a general rule you don’t want your cage to be “based”. You don’t want to give your opponent the option of knocking down those corners and then gaining easy access to the ball carrier. We’ll come back to this in the next couple of posts.

In the picture above, the Nurgle have just played their turn. They used their Blitz to knockdown the line Elf in the middle of the line, and then press in with their S4 Stand Firm pieces. The Elves now have to decide whether they want to commit pieces to perhaps throw 1D or uphill blocks or whether they should dodge away.
As the Elf coach, I’d probably dodge away on this turn, but that means rolling ~5x 2+ dodges without a build dodge reroll (about 40% to succeed on 5x 2+). I also have to get away from the Beast’s Tentacles (4+). If any of those dodges fail, then my screen on the next turn might be incomplete, or I might be burning team RRs.
If there’s enough time in the drive, repeatedly pushing in like this will get RRs of your opponent and will create space. But it can be slow progress.
Kidnap
Fourth, any player you knock down on your blitz action, you can “kidnap”, so that there are fewer pieces available to screen on future turns.
Mark and bracket the downed player or surround them so that they can’t get out and also can’t risk standing up. Every piece you remove from a defence makes it harder for them to cover everything and buys you some space. Obviously, every removal helps too, so fouling these downed players is often warranted.

In the pic above, the Nurgle have blitzed the same lino (blue arrow) but pushed him back sideways rather than straight backward. They have now pressed in on either side meaning that that piece would need a 4+ / 2+ dodge to get back into the defence. Even one turn with not a full squad can be enough to leave holes for the offence to exploit.
Space
Fifth, take any space that you can when you can. Recognise tempo shifts such as a turn where you have generated a few stuns or your opponent hasn’t quite got back into position and use the opportunity to take more space on those turns Again, the forward press should almost always avoid ending with based cage corners. The exceptions are when you have skills like Stand Firm and Side Step, or enough Guard and Strength and enough local numbers, to allow you to base-up safely.
Salient
Six, consider using a “Dusher” SalientTM. This is an approach where you have your main ball carrying cage on one side of the centre then on the other you advance a Big Guy or maybe two of your stronger (and ideally higher AV) pieces forward into an exposed but forward situation, pushing a salient out of your line.
Your opponent then has to choose between fighting those pieces or backing away from them and ceding space. If they fight them, they usually will need multiple players to get the assists they need, this should mean that there is more space elsewhere. If the Big Guy salient gets ignored and dodged away from, then on your next turn you have a forward point against which you can advance into.

Fundamentally, this is just a different way to press in, but we gave it a different name!
A word of caution; the original Dusher Salient, for which it got its name, didn’t go well. Dusher pushed an Ogre into a crowd of my rats but it was too early in the drive so became less of a staging post and more of a suicide run; the rats were fast enough to both take down the Big Guy, foul him out, and get back into a full screen before too much ground was lost.
We can all learn from that lesson; if pushed too far or, more likely, too early. then the advanced pieces can become isolated, without gaining the space you are looking for. Sending a Big Guy bravely forward is most effective when your opponent won’t have time to engage and also then recover.

End of the drive… Options for when you must get past
Toward the very end of a drive if your opponent stands off into columns or chevrons your final sprint to the line can be difficult.
If you have only one turn to go, none of the patient approaches above will be good enough. The basic option is running a gauntlet of tricky dodges, OK if you have Stunty, Ag2+, Two Heads and Break Tackle, but for pieces with more mortal-level 3+ dodging there might be some other options.
An Example Puzzle
I thought I’d end this section with a little bit of a “puzzle”.
I post interesting positions from real position quite regularly on this site. Looking at puzzles is good brain-training to find solutions so when you are playing in a game you can recognise patterns.
Using the “puzzle” below I’ll talk through some of the options for the final push to the line.
Starting with the wide-angle view first, the Nurgle have got a bit bottled up in the wide zone. Can you spot the best way through?
(The ball carrier Pestigor has S3, Ag3+, and MA6 and Horns)

Gauntlet
The obvious option, before we look for anything fancy, is simply to Blitz one of the players in the front row, then dodge through the rear row on a 4+, 4+, 3+.
When we Include the 2D Blitz needing pushes or better, that yields 15% total odds. This rises to 36% with 1RR, 47% with 2RR.

But can we do better?
Ball Carrier Blitz.
The slight offset to the right of the defensive line has left an opportunity to blitz the rear corner.
There are two options; hit with 2D with a S4 Bloater or you could 2D with the Pestigor ball carrier (with Horns giving him a +1S on a Blitz). The ball carrier hit is better here (assuming the bloater doesn’t have any skill), as it cuts one dodge out of the sequence.
The ball carrier hit needs to be a push or better and then he can follow into the square for a 3+ dodge and 2+ rush to score.

2D needing pushes or better (89%), followed by 3+ and then 2+, takes us to an overall success rate of 49% before rerolls (79% with 1RR). Not bad and a big improvement over running the gauntlet.
Defender takeaway… don’t leave a kink!
Improved Defensive Set Up!
OK, let’s tweak the position. Let’s look at what could happen if the end column is moved back one square. Now we can’t easily blitz the rear player to create an easier dodge… Is there a different solution?

Box Filling / Chain Push
One of the things I obliquely referenced above in the difference between Chevrons and Columns is that it can be easier to generate a chain push vs Columns.
If you look to the far right of the picture, we can access the two squares next to the end defenders. If we fill those, we then have a box that we can blitz into and chain push a defender out. Nurgle are quite slow and not the best at doing this… but as they’ve followed some of the advice above they have a bit of width and get pieces in position on a rush.

Now the blitz comes from the Bloater (with the block dice at his feet) from the corner. This will create a chain push to force the back line of defence away, and create a lane for our ball carrier to rush his way to the line.

This one is 2D needing a Pow/Defender Stumbles (56%) and then 2+ Rushes to score (overall 46%). However, if the Blitz was a push (33%), then the score would be on a 4+4+3+ followed by the rush. So, the overall chance of scoring adds up to about 50% before rerolls.
Note here that if the Elves had one more piece available to block the angle to fill the box then the defence would have been quite a lot stronger.
When placing the defending pieces it is good practice to look for potential chain push solutions that could leave an easy route to the endzone.
Wider Defence
In the final option, the Elves have that extra player to widen their screen.
Now we don’t have the option of chain-pushing a hole to run through. So, we are back to punching the front and running the gauntlet… or are we?

Leaping over Downed Players
There is another option. If you roll a Pow, you can knock that player on the ground and then leap over it.

The blue line in the pic shows that in action. As we are leaping from one TZ into one TZ it is a 4+ (-1 Ag roll), then 3+ dodge for the Pestigor. This is one fewer 4+ roll than dodging through the line, in the same situation.
Note: If the defending team had positioned the rear row of their screen one row further back, so there was a gap between front and rear, then the jump-over option would’ve needed a 4+ then 4+ to succeed, i.e. slightly harder.
Video explainer
Next Week – Ball Protection, Cages and Cage-breaking
Previous posts below.
subscribe to get notified of new posts in your inbox

Enjoyed this? Found it useful?
This is part of an expanding series, come back next week for the next installment.
The text here originally came from our book – Blood Bowl Strategy: Third Season Unofficial Strategy Guide — I’ve made some edits to make it more suitable for online posts. The book is a complete guide to positioning, tempo, drive planning, defensive structures, offensive patterns, league development, inducements, and tournament preparation. 266 pages, ~74,000 words of our collective wisdom designed to take you from a beginner to a >50% win rate coach.
We will be posting excerpts from the book over the coming months – you can subscribe to the blog to receive notifications and the next basics post straight to your inbox.
Physical copies of the book are available on Amazon (check your own country’s listing – e.g. amazon.co.uk here). Or I usually have a box of books with me at UK tournament events. Or message me if you want to buy a batch.
Digital copies of the PDF are available via the button below:




Leave a Reply