
The big clue to this one is the Grab skill.
We are going to use the Ogre to chain the Troll forward into the lino, smack the lino and then use the free BO to (hopefully) pop the ball carrier. Simples.
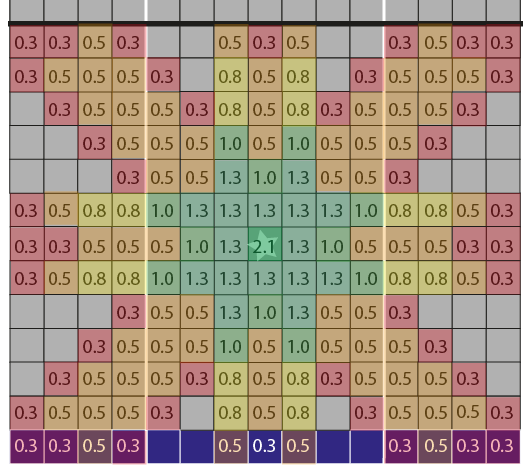
Step 1, Goblin moves over to behind the troll (safe), and BO on right moves one square over to provide an assist (also safe). These two moves tighten the formation but there are no other Nobs left on the pitch, so it’s not too bad. Then we block the Ogre with the BO next to the troll (marked in red in the diagram below), we use Grab to pull the Ogre into the space behind. We need pushes here (62% if we choose to rely on Brawler to improve Both Down or 80% with team RR).

With the Ogre in position, the next BO smacks him, pushing into the T shape and we chain-push the Troll upwards. We do need to get the Ogre down so ideally a Pow/Stumbles (again 62% w Brawler, 80% with RR* although we’d only RR skulls/bd). Pushes are OK here, I’ll come back to that.

From there it should be relatively straight forward. The Troll hits the Lino (who will fend) needing a really stupid roll then a push or better (combined 74% / 94% with 1RR). Then one of the spare Goblins or BOs can step up to cancel assists and the other BO can go and hit the ball carrier, for 2D (30% / 51% with RR). Personaly, I’d use a Goblin to cancel the assist and pop the other BO on the other Blitzer.
Overall, it’s about 12-40% chance of getting the ball down depending on RRs/Brawler usage.
If we had to push the Ogre on the second hit, we could go straight across into the Goblin that had moved and chain him upwards and then take the 2D hit with Goblin at the bottom of the T for a second chance to Pow down the Ogre. Another push here and its still not over… we could move the final non-activated Goblin to below one of the left BOs, Troll hit the Ogre into that T, chain the BO onto the wide blitzer and create a route for the last BO to hit the ball carrier. This line has no recovery option as everyone would have been activated (in fairness, recovery is very much secondary to the whole line), but ball down and most players occupied would be hard to recover from.
Is there a better play? What’s the alternative line?
Well we could not go for it. One of the BOs has block, so we could layer up the screen with the Goblins, then blitz with Block and go Orco-et-mano 1:1 with the free BOs, making the opponent roll some big boy dice next turn.
Relevant info to the hit vs pressure decision; it was 1-1 with about 4 turns left. Considering the game-state, the Nobs would be more happy with a draw. Whereas the BO coach (me) was looking at this as a winnable position. I had scored quite early on the drive as there were lots of Nobs resting in the KO/Cas box. I had 1 RR remaining. Also relevant; it was a league game without huge consequence to the final table standings… so I went for the fun chain play.
The result; first dice double both down, brawler RR into another both down. Dave (Dusher1) 1D’d through the outside BO and then headed downfield relying on blodge to get him out of trouble. It + a snaked rush to hit the carrier did the rest, and it ended 2-1 to the Nobs. Sad times. However, we did win a £50 bar tab by winning the pub quiz, and its never a bad an evening playing your favourite board game in a brewery when your drinks are effectively free!

Leave a Reply