Before we start, we should acknowledge that the Norse have got the Undead in a good spot here. They don’t need to go for the ball. But it’s a good exercise to work out the options before picking the line with highest expected value.
The Easy Option
I think most experienced players will spot this option quite quickly…
Step 1: Stand up lino on the ground (safe moves first). Block the Wight on the left. If a push, he goes next to the standing lino and get’s hit again. If a pow, we don’t follow and keep our defensive shape. We need him on the ground so that we can step in to cancel the zombie assist later. if he doesn’t go down on both hits, then we abandon the sack attempt.
Step 2: Blitz with the free Valkyrie into the box with the zombie, pushing the lino diagonally down. The Valk then finishes her move by standing in the other spot next to the downed wight.

Step 3. The Yhetti hits down into the Zombie (3D), pushing the lino down into contact with the Ghoul. Assuming the Yhetti behaves, the free Ulf then tags the standing Zombie and downed Wight and one of the free Linos tags out the Skeleton and Zombie. If the final Lino wasn’t needed to hit the Wight, then they can swing around and tag the other Ghoul (not shown).
This gives 1D on the ball. However, the ball carrier has block and dodge, so we will be “pow fishing”.
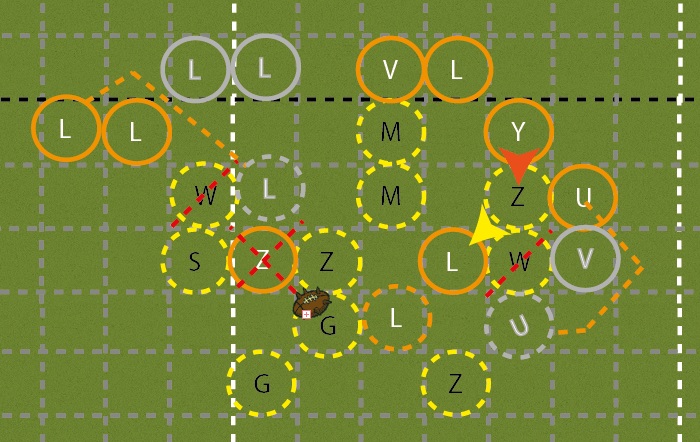
Odds: 2D with backup option 2D to get a pow on the Wight (80%). 2D Blitz on the Zombie needing pushes (55% option to RR, 80%). Yhetti activation (2+), then 3D(into 2D) (~80%), then 1D on the ball (17%/30% with RR). What/how many RRs to put in depends on turn, score and how many available; but likely wouldn’t RR the hit on the Wight. It’s roughly 30-50% to get the hit on the ball, and then the decision on whether to RR the hit on the Ghoul takes it to 8-16% overall.
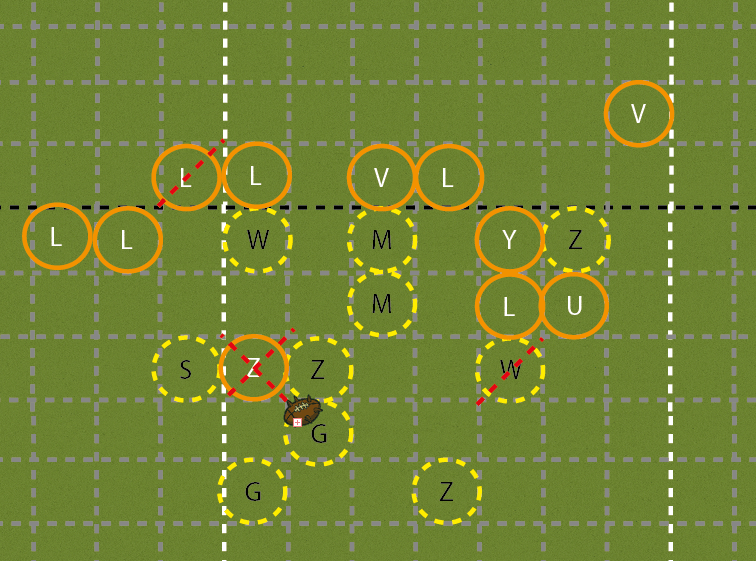
Note that If the Yhetti doesn’t activate, we could still get 1D on the ball by chaining the same lino into contact. To do that we could use the other Valk to hit the Mummy and follow. Then the non activated lino on the far left can run around fill the final T square allowing the Ulf to chain the Lino into contact with the ball carrier. The final free lino can then run around the back to tag the final zombie. I’m not a fan of this backup line as we would still only get 1D on the ball carrier needing a pow. It’s worse as using the extra pieces from the left means that there’s now a gaping hole that the pair of ghouls and skeleton can run through very easily and the Norse will have given up their strong position. Better to eat the Yhetti fail and keep the pressure high.
A better option?
But there is another option… it’s more aggressive and more interesting, with worse fail state but is interesting and might be the better choice… did you spot it? Here’s the position again if you want another look.

Leave a comment